Design Thinking in the Elementary School Classroom
Disclaimer: This post may contain affiliate links. This means that if you make a purchase, I may receive a small percentage of the sale, at no extra cost to you.
Design thinking is a process for creative problem-solving.
More specifically, design thinking is a problem-solving process that involves five key steps: empathize, define, ideate, prototype, and test. Design thinking at its very core is human-centered.
Design thinking is used to help people innovate. Many organizations around the world use design thinking for that exact reason: to spark innovation.
Most notably, IDEO, a design and consulting firm that has created some of the world’s most revolutionary products, is a pioneer of the design thinking process. IDEO is often credited with inventing the term “design thinking.”
Other organizations, too, use this five-step process as a way to solve problems and create innovative solutions.
You might be familiar with the Stanford d.school – Stanford University’s design institute – which is another example of a leading organization that uses design thinking and provides professional development opportunities.
David Kelley, founder of both IDEO and the Stanford d.school, has summarized design thinking by saying:
“What we, as design thinkers, have, is this creative confidence that, when given a difficult problem, we have a methodology that enables us to come up with a solution that nobody has before.”
One reason I mention the d.school is that they have a K12 Lab, which according to their website, “aims to obliterate opportunity gaps in elementary and secondary education by designing new, more equitable models and sharing design approaches with students + educators.”
How is Design Thinking Used in Education?
Much like how design thinking is used in companies and organizations, design thinking is also used in the classroom. Teachers are so creative – we know this and preach this on my blog – and teachers have noted a number of educational benefits to using the design thinking process in the classroom.
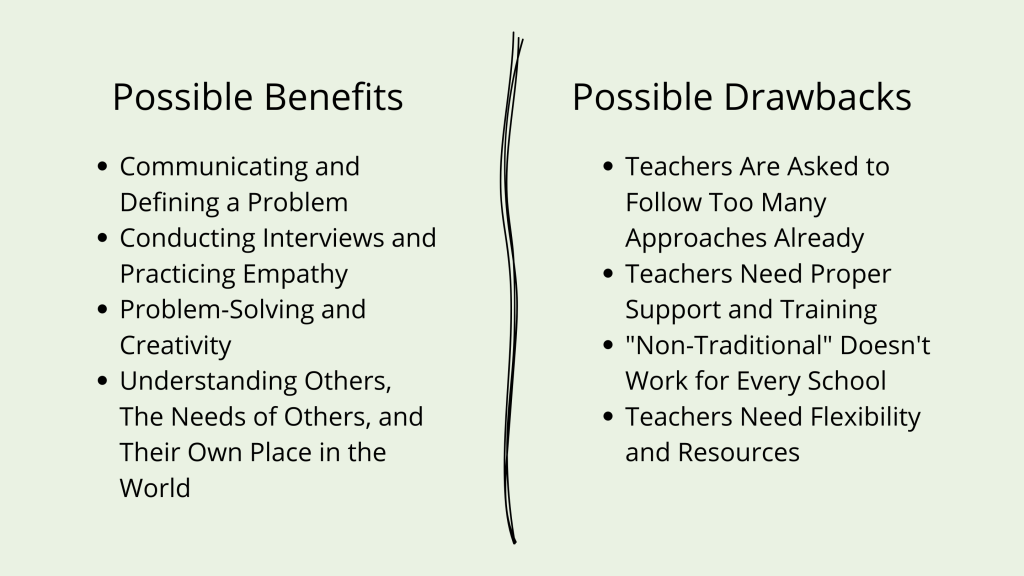
Possible Benefits
Design thinking involves communicating and defining a problem. Oftentimes, design thinking requires students to conduct interviews and practice empathy, skills that can be difficult for young children.
Design thinking, of course, as we have addressed already is a problem-solving approach that helps students practice their creativity.
And, design thinking can teach children how to understand others, the needs of others, and their own place in the world as well.
Possible Drawbacks
Despite these possible benefits, there are a few drawbacks that come to mind when implementing design thinking in the classroom.
First, many teachers – at least in progressive education – often note that they are asked to follow a new perspective, new tool, or new approach every few years. If design thinking is hot right now, it’ll be inquiry-based learning next, and so on.
The reality is that it can be difficult to keep track and keep up. If teachers are not trained or provided proper support, it can be tricky to implement design thinking in the classroom, especially with our youngest learners.
Lastly, for teachers who are excited and eager to explore design thinking, there might be some resistance from schools. Design thinking is sometimes considered “non-traditional,” which provides a setback for teachers who do not have the resources or flexibility.
Design Thinking Project Example
Now that we have discussed design thinking and its role in K-12 education, I’m going to walk us through an example of a design thinking project I recently did with 2nd grade students.
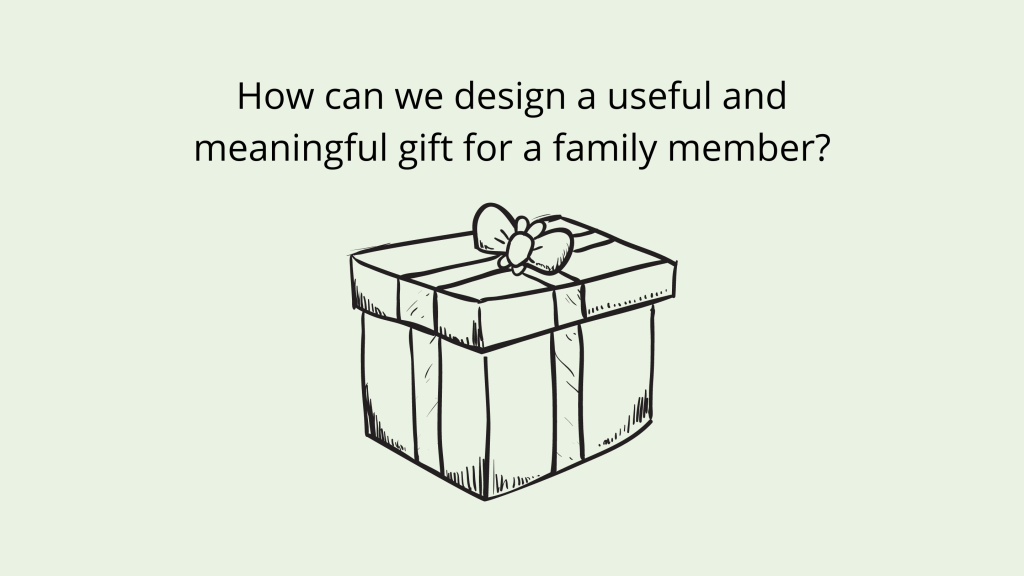
Over the course of 4 weeks, I worked with 2nd grade students on a design thinking project that I adapted from the Stanford d.school. The original project, titled “The Gift-Giving Project,” was designed to last about 90 minutes.
Instead, I extended and deepened this project, as well as embedded 2nd grade standards from a variety of subject areas. During our project unit, I taught these students for 1 hour a day for 4 weeks, meaning that the total project time was around 20 or so hours.
The purpose of this project was to help students understand and practice empathy. Our essential question was: How can we design a useful and meaningful gift for a family member?
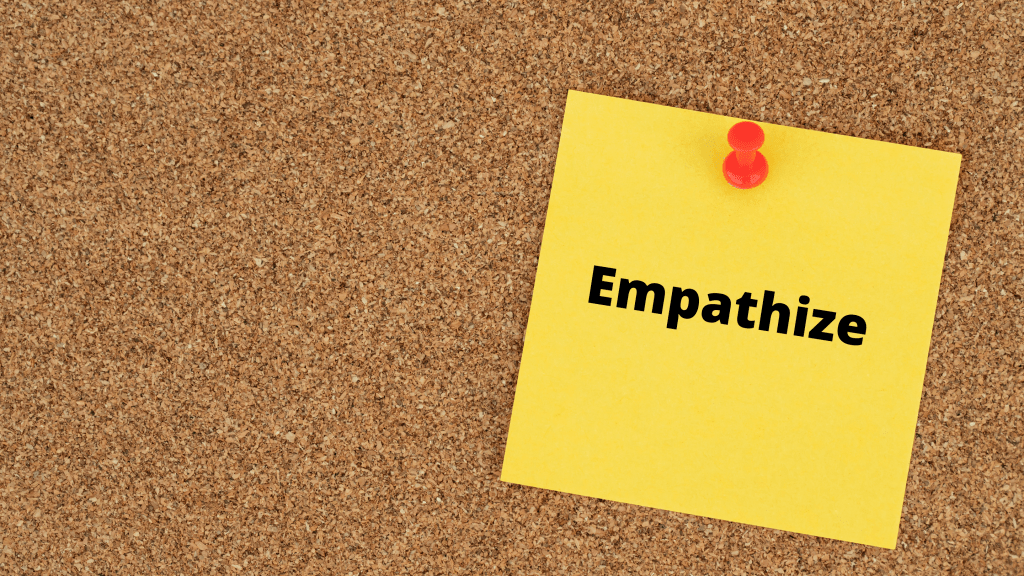
Stage 1: Empathize
The first stage of the design thinking process is: Empathy.
In design thinking, empathy is important because it allows designers to develop a deep understanding of the problems that the people you are designing for might face. In order to design a solution, we need to have a deep understanding of not only the problem, but also the people, their environment, and their role within that environment.
Our Project:
Because our project really focused on empathy, this section is longer than the others: we spent an entire week focusing on empathy. On our first day of class, students focused on developing a firm understanding of the first stage of the design thinking process: empathy.
Within our larger essential question for the entire project, students had an essential question of the day: What is empathy? Why is it important to care about someone else’s point of view?
During their study of empathy, students read You, Me, and Empathy by Jayneen Sanders. We discussed themes like regulating emotions, noticing similarities and differences between people, and bullying.
Students also learned the expression, “Walk a mile in someone else’s shoes,” and then developed their own definition of empathy:
Empathy means we can understand and share the feelings of another person.
Once students had developed a definition of empathy, we were able to begin our project. For our second class, we tried to answer the questions: How do we conduct interviews? How can we be active listeners?
In other words, we chose to hone in on interviewing as a strategy to develop empathy and gain understanding about others. We watched videos about how to conduct an interview – and videos about what NOT to do.
These first two classes were filled with a lot of front-loading. If I were to do this project again next year, I would consider making these first two classes more hands-on.
Next, students were introduced to their Design Journals, a small booklet where they would track and document their design process. Students put together a list of interview questions – some created by me, others created by them – that they would need to ask their family members in order to gain empathy.
We started off by practicing interviewing in partner pairs in class. We practiced being active listeners and taking notes during an interview. Students took turns and conducted about 15min long interviews each.
After students felt prepared, they took their interview questions home and interviewed their family members.
Define
The second stage of the design thinking process is: Define.
The Define stage is crucial. During this stage, students develop a meaningful and actionable problem statement. This problem statement is used to guide students to figure out what problem they are attempting to solve. With elementary students, I’ve found that the Define stage can be tricky at first. This stage requires students to summarize and synthesize their learning from the Empathy stage.
Our Project:
After students conducted their interviews at home, they returned to school with their Design Journals, ready to start building. What students didn’t realize, however, was that they needed to define the problem before they could start designing, much less building.
With 2nd graders, we used a framework to help students write a problem statement. Our framework said:
My family member feels loved when ____. My family member feels appreciated when ____. My family member needs help with ____.
Students who took their time on the Define stage consequently spent more time empathizing and synthesizing their learning from the interviews. Students who rushed through this stage later discovered that they needed to refine their designs to meet the needs of their family members, rather than the needs of themselves. This was a profound realization for students – and one that stands out to me as a highlight of this project.
Once students mastered the Define stage, they were able to truly experience their definition of empathy.
Ideate
The third stage, Ideate, is all about “thinking outside of the box.” During this stage, students will brainstorm solutions to the problem they defined in the previous stage. In many cases, ideating looks like your typical brainstorming session. In fact, this is the stage that is often associated with the sticky note-style brainstorming you see in design thinking.

Our Project
In our project, we created some structure around the ideation process, in an attempt to avoid overwhelming students with too much choice. In students’ Design Journals, they had a piece of paper split into three sections, labeled Gift 1, Gift 2, and Gift 3. Students had about 7 minutes or so to create each gift design.
As students were brainstorming, I noticed a pattern, which I alluded to in the previous stage:
Many students brainstormed designs that didn’t match their problem statements. In fact, many students brainstormed designs that they wanted, rather than what their family members wanted.
With this realization, I decided I needed to re-teach this idea, and help students to shift their mindset to focus on the person who would be receiving the design.
To help with this, we watched a video from other kid inventors who created designs to help other people. Some of their designs included: “shovel shoes” to help their dad shovel snow in the winter, and even a “back washer” to help someone with a broken arm wash their back in the shower.
In watching this video, students began to realize that they could still create exciting and interesting inventions, even if those inventions served other people.
Prototype
During the Prototype stage, students begin building their ideas. This stage focuses on identifying and building the best solution for the problem or need. Oftentimes, engineers and designers use scaled-down versions of a product when creating their prototypes. For example, they might use inexpensive materials, build smaller models, or even create just one specific feature within that product or solution.
Our Project
In our project, students used recyclable materials – from cereal boxes to paper towel tubes to plastic water bottles – to build their prototypes. Before students could begin building, however, they had to get their designs approved by the teacher.
The reason I wanted students to have their designs approved is because I wanted to make sure they fully grasped the concept of identifying and building a solution to a need expressed by their family members.
Students spent about 3 class periods building their prototypes. Early finishers worked with other students in the class to help them build their designs. I loved seeing students collaborate, especially during this school year in which collaboration was made difficult.
Test
The final stage of the design thinking process is: Test.
And while this is technically the final stage, it is important to note that design thinking is iterative, meaning that the process is never really over. Designers can continue to redefine, recreate, rebuild, redesign, and refine their work.
Our Project
For our project, testing took form in a few different ways.
First, students tested their own designs by writing about them. 2nd graders practiced their writing skills by writing about their inventions. In doing so, students also practiced reflection.
Students were tasked with: (1) coming up with a name for their invention, (2) addressing who their gift was created for, (3) answering the question: how does your gift help them?, and (4) answering the question: how does your gift work?
In this writing assignment, students were able to meet 2nd grade writing standards, as well as reflect on their work over the past 3 weeks.
Once students finished their writing, they then used what they wrote as a script for our class video. Students took turns filming themselves talking about their inventions, defining the needs of their family members, and sharing how their invention solves that problem. In doing so, students practiced their presentation skills.
This video, however, didn’t stop there.
We also had students talk about the process because as a teacher, I try to emphasize the importance of process over product. Although design thinking in the classroom typically leads to the creation of a final product, I wanted students to understand and value the process that led them there.
Students wrote their own script to talk about the design thinking process, including all five stages, and some of their key learnings about empathy and reflection.
Fast forward to the end of our project, students took home their creations to share with their family members and receive feedback for the Test stage.
Student Project Examples
Now that we have covered the stages of the design thinking process, I wanted to share a few student projects with you. I wish I had time to share each and every project because they are all truly unique and stand out in their own ways:
- The Encourage-O-Meter: This 2nd grader noticed her grown-up needs an extra boost and some words of encouragement when she feels down. The Encourage-O-Meter is a robot that spits out compliments on small slips of paper when her mom needs a hand.
- The Time Saver: This 2nd grader learned that her grown-up struggles with finding enough time in the day to get all their tasks done. She created The Time Saver as a solution: a clock with arms that go back in time when you need an extra hour.
- The Phone Chamber: This 2nd grader learned that his grown-up has a hard time putting their phone down, when there are too many notifications and items to keep track of throughout the day. The Phone Chamber is almost like mousetrap for the phone. When they need a screen break, they can put the phone inside, and of course, there is a peep hole to check in case of emergencies.
Thank You
I really loved seeing these project ideas. I loved seeing how students developed a greater understanding of empathy and how they were able to shift their thinking from me to you. Above all, I enjoyed seeing students sparkle and light up when they created inventions they felt truly proud of.
While this project specifically might not work for your students, I hope it gives you a better idea on how to implement design thinking in your classroom. In today’s post we covered: what design thinking is, how design thinking is used in education, and some examples of what design thinking can look like at all five project stages.
If you end up trying out design thinking in your classroom, let me know how it goes! You can email me at myedtechclassroom@gmail.com, DM me on Instagram @edtechclass, or leave a comment down below.
Additional Resources
In doing research for this blog post / podcast, I found inspiration from the following resources:
Categories

10 thoughts on “Design Thinking in the Elementary School Classroom” Leave a comment ›